Hello!
My teaching experience includes teaching students at the Primary and the Middle school levels. I find each teaching experience so unique and a scaffold for further teaching and learning.
As learning is eclectic, I focus on creating resources that are not just practical and meaningful but also fun.
So connect with me to motivate, inspire, and empower.
Laurane @teach2tell.com
Teach your students 20 essential reading strategies. The 30 graphic organisers (colour and blackline) will help your students practise key reading strategies with any text they read.
Each graphic organiser provides an explanation of the reading strategy in focus. Students will be able to successfully document their findings via the writing prompts. The eye-catching graphics and student-friendly organisation will surely motivate the most reluctant.
ITEMS INCLUDED
✅ 30 BLACK AND WHITE graphic organisers to document the application of the reading strategies
✅ 30 COLOUR graphic organisers to document the application of the reading strategies
✅ 1 cover sheet (featuring name and grade) to compile all organisers into a booklet
✅ 2 page writing template
The reading strategies in focus are:
⭐ Author’s Purpose
⭐ Asking Questions
⭐ Cause and Effect
⭐ Characterisation
⭐ Compare and Contrast
⭐ Context Clues
⭐ Determining Importance
⭐ Drawing Conclusions
⭐ Fact and Opinion
⭐ Main Idea and Details
⭐ Making Connections
⭐ Making Inferences
⭐ Making Predictions
⭐ Problem and Solution
⭐ Setting
⭐ Sequencing
⭐ Story Elements
⭐ Summarising
⭐ Synthesising
⭐ Visualising
SUGGESTED USE:
Focus on one reading strategy at a time. Have students record their responses on the specific graphic organiser as they read. Use the writing templates if you would like students to write a paragraph/page from information documented in the organiser.
This resource will also be very useful to teach, review and apply the reading strategies in preparation for Naplan.
THIS RESOURCE IS INCLUDED IN THE BUNDLE:https://www.tes.com/teaching-resource/reading-strategies-bundle-11614333
This writing unit will help you scaffold the structural components of an persuasive essay and facilitate your students to write persuasively on given topics.
There are four lessons that will scaffold writing at every stage of the persuasive essay on a given topic. Each lesson features a booklet cover. All the individual lessons can also be combined into one whole booklet with a general cover.
ITEMS INCLUDED:
1. Posters on Persuasive Writing x 3: definition, key points, structure
2. Sample Text: All lessons revolve around this sample text. Students will colour code the parts of the text as the lessons are delivered.
3. Sample Text: targeting differentiation for higher ability students
4. Mini Lessons x 4: Deconstructing the Introduction, Deconstructing the Body, Deconstructing the Conclusion
5.Peer-editing checklist
6.Self-editing checklist
7.Teacher Marking Rubric
8.Six posters on Persuasive Writing Signal Words
9.Blank Writing Sheets on a topic of choice
10.Two page mini booklet featuring the sample text. Have students refer to this booklet when attempting lesson 1 on deconstructing structure. Assembly instructions included in file.
ABOUT MINI LESSONS:
LESSON 1: DECONSTRUCTING STRUCTURE
20 questions that target the key components in terms of structure, language, and vocabulary of a persuasive piece of writing.
LESSON 2: DECONSTRUCTING THE INTRODUCTION: HOOK, OPINION, THESIS
Focus on two major hooks: strong statement, hypothetical question. Students will write their own hooks, opinions and thesis statements on given topics based on sample.
LESSON 3: DECONSTRUCTING THE BODY: TOPIC SENTENCE, DETAILS, CONCLUDING SENTENCE
A sample body paragraph is provided for students to colour code the topic sentence, supporting details and the concluding sentence. A graphic organiser enables students to brainstorm their ideas of body paragraphs on a given topic. These ideas are then written out in succeeding organisers marked: first body paragraph, second body paragraph and third body paragraph. This is an opportunity for students to also make revisions and edit their work as they write.
LESSON 4: DECONSTRUCTING THE CONCLUSION
A sample concluding paragraph is provided for students to colour code the parts of a conclusion: summary statement, brief restatement of three reasons given in body, and a call to action.
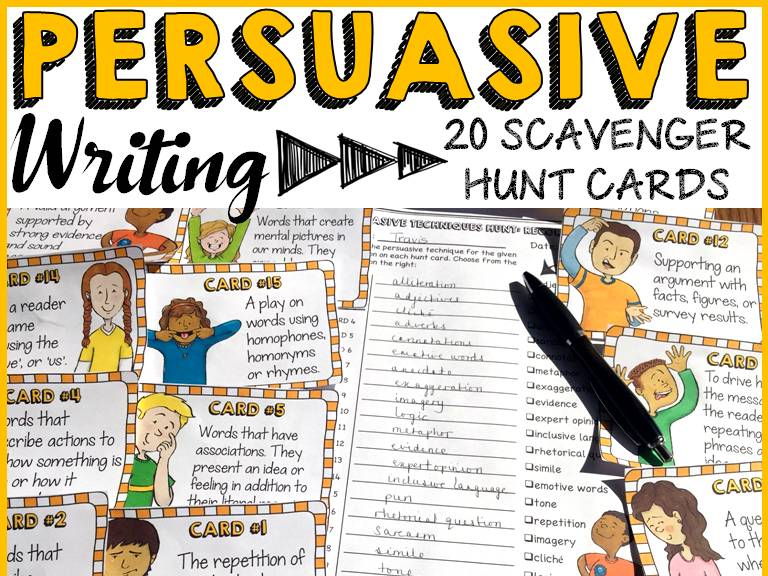
Teach students 20 persuasive techniques of the persuasive writing genre with this interactive fun resource. This pack includes 20 Scavenger Hunt cards, 1 Recording Sheet, and an Answer Key to equip students with necessary content information on persuasive writing techniques that they can apply to their own persuasive essays.
The persuasive techniques featured in the 20 hunt cards are:
✓ adjectives
✓ adverbs
✓ alliteration
✓ anecdote
✓ sarcasm
✓ connotations
✓ metaphor
✓ exaggeration
✓ evidence
✓ expert opinion
✓ inclusive language
✓ rhetorical question
✓ simile
✓ emotive words
✓ tone
✓ repetition
✓ imagery
✓ cliché
✓ logic
✓ pun
ACTIVITY
Place the 20 information cards on Persuasive Writing Techniques around the classroom. Students can work individually, in pairs, or in small groups to find the answers to all 20 questions on their recording sheets. They must read the information on each card to find the answer for each corresponding question on their recording sheets.
EVIDENCE OF LEARNING
♦ After the hunt, discuss the answers as a class. I have the pdf version of the hunt open on the interactive whiteboard, so students refer to the information card for each question on their recording sheets.
♦ The interactive nature of the hunt makes it fun for students to learn the persuasive techniques characteristic of a persuasive essay. Students will be more confident to use these techniques when writing.
Please note that the 20 Hunt cards feature just a definition of each technique type. Students need to read the definition and identify the persuasive technique. This will enable you to assess prior knowledge and also enable students to consciously think of the answer prior to responding or to make an educated guess.
Wish you and your students a successful year!
If you would like to teach your students a step-by step approach to writing persuasively and also scaffold every stage of the writing process, then you will find this resource very useful. All components in this pack are designed to facilitate students to sit formal writing assessments.
The materials adhere to a formal writing style complete with close detail to elements of structure and composition of persuasive texts whereby opinion is supported by relevant details. Further details of lessons included in this pack are outlined below:
* All lessons to teach and model the parts of a Persuasive Essay revolve around the mentor text, ‘Dogs Make the Best Pets’ The graphic organisers also enable students to write on other topics of choice.
LESSON 1: THE STRUCTURE
✓ Persuasive Writing Anchor Charts x 3
✓ Mentor Text x 1 on the topic ‘Dogs Make the Best Pets'
✓ Cut and glue parts of the mentor text activity to study structure
✓ Colour-code parts of the mentor text to study the structural components of the introduction, body and conclusion.
✓ Questions to draw attention to structure (to use with mentor text and informative article)
✓ Persuasive Techniques including the ethos, pathos and logos modes of persuasion.
LESSON 2: THE INTRODUCTION
♦ Scaffolded activities based on the mentor text to enable students to write the three parts that make-up the introduction: hook, opinion and thesis statement.
♦ Activity focus on the five type of hooks including work with QR Codes,
LESSON 3: THE BODY
♦ Cut and glue interactive activities and reference to mentor text to help students better understand the parts of the three body paragraphs: the topic sentence encompassing the reason, supporting details and concluding sentence.
LESSON 4: THE CONCLUSION
♦ Reference to colour-coded mentor text and deconstructing parts of a concluding paragraph activity to better understand the parts: summary statement, re-statement of reasons and call to action.
ALSO INCLUDED:
✓ Graphic organisers to organise ideas of the introduction, body and conclusion when planning to write on a given prompt are included for all lessons.
✓ Writing templates for published pieces.
✓ Self-editing checklist
✓ Peer-editing checklist
✓ Teacher marking rubric
✓ Booklet cover for all lessons if compiling lesson sheets.
✓ Posters x 6 on Persuasive Writing Signal Words
Once you have taught students the style and structure of a Persuasive Essay, the job is half done. All the best! I hope you will have an idea of how I have used this resource with my students via the guided notes for each section. Further instructions on how to use this resource are in file.
Scaffold the writing of the parts of a narrative that include the elements of a plot (exposition, inciting incident, conflict, rising action, climax, falling action and resolution) with this comprehensive pack comprising of 40 editable Power Point presentation slides, student guided interactive notes, sample texts, self-editing and peer-editing checklists and marking rubric.
Overview of Items Included:
1.40 editable and animated Power Point slides.
2.17 guided note-taking sheets.
3.Cover sheet to collate all note pages into a booklet.
4.Teacher reference notes to use along with the presentation.
5.Sample narrative text for each element of the plot: exposition, inciting incident, conflict, rising action, climax, falling action and resolution
6.Plot diagram to be filled in by student for each element of the plot as it is covered.
7.10 Review/assessment questions on the plot.
8.Picture narrative writing prompt: third-person fictional or personal.
9.Narrative writing prompt: student’s choice
10.Plot diagram for organising story events.
11.Student check-list: self-editing
12.Peer-editing check-list.
13. Teacher marking rubric.
14. Snapshot of all 40 (colour) slides on a sheet for both student (glue in notebooks) and teacher reference. Prints fine in black and white.
LESSON ACTIVITY:
Collate all guided note sheets (except the story maps) into a booklet. Staple together with cover sheet. Use the story map sheet in conjunction with the guided notes. Students will document content from the presentation. They will highlight key evidence in the sample text and fill up each part of the story map for each element of the plot as it is presented. Keep a separate copy of the story map on hand for each student. This way students don’t have to keep going back and forth through their notes to refer to the story map. Elicit response prior to presenting each slide to gauge students’ prior knowledge or to make them think constructively. Refer to the Teacher Guide as you present.
The slides are editable so you will be able to edit content or change spellings. Some text that is locked in with the clip art is not editable; this is in keeping with the artist’s terms of use.
EVIDENCE OF LEARNING:
Have students practice writing a personal or third-person fictional narrative on the provided picture-writing prompt or on a topic of choice. They use the story map to plan and organise the story events.
Students self-edit and peer edit using the self-editing and peer-editing checklist. Use the Teacher Marking Rubric to provide an assessment score. This resource has greatly helped my students to structure their narratives and I hope it will help your students too.
Your students will enjoy learning about Easter with this 32 QR Code Hunt Fun Facts pack. Please note only Fact Card 1 outlines why Easter is celebrated. The rest of the fact cards all feature fun facts and are not of religious significance.
WHAT’S INCLUDED
32 QR Code Cards on Easter
4 Recording Sheets
4 page Answer Key
26 Writing Templates featuring Easter images; 1 blank poster included for students to self-illustrate.
Banners (plain and decorated)
ACTIVITY
Place the 32 QR Code Cards around the classroom. Students can work individually, in pairs, or in small groups to find the answers to all 32 questions on their recording sheets. They must scan the QR Code to find the answer for each corresponding question on their recording sheets. Students make an educated guess about the possible answer prior to scanning.
Early finishers who complete the Qr Code Hunt can design their posters. They write 2-3 facts on a template of their choice.
EVIDENCE OF LEARNING
Wrap-up the activity by getting students together and asking them to share the facts they found the most
interesting. They may refer to their recording sheets and posters.
** You may break-up the activity and do cards (1-18) or (19-32) depending upon time available. Copy recording sheets accordingly.
** These cards will assess students’ prior knowledge or alternatively pique their interest for them to want to scan the code to reveal the answer. Some cards also have picture clues (without giving away too much) to set up students for success.
ONLINE SECURITY
Once a QR code is scanned, students are not directed to a website but rather to a text only
link. If the QR Code Reader app attempts to display the answer with a web browser, choose the
option of view in ‘plain text’ in settings/preferences.
Prior to requiring students to write a narrative, it is imperative that they know its structural components. This mini unit will help your students understand the purpose of the three main points of view: First Person, Third Person Limited and Third Person Omniscient.
WHAT’S INCLUDED:
✓ Cover Sheet for Booklet.
✓ Anchor Chart (colour and blackline) outlining Point of View.
✓ First Person and Third Person Writing Sample.
✓ Venn Diagram to Compare and Contrast First Person Point of View and Third Person Point of View.
✓ Switching from Third Person point of view to First Person point of view for given prompts.
✓ Switching from First Person point of view to Third Person point of view for given dialogues.
✓ Switching a story extract from the Third Person point of view to the First Person point of view.
✓ Switching a story extract from the First Person point of view to the Third Person point of view.
✓ Writing on a given scenario from two different points of view.
✓ Picture Prompts (x 3): writing from the First person and the Third Person point of view.
✓ Summing Up: 11 multiple-choice questions on understanding the effectiveness of Points of View in
writing.
This resource will help your students write a narrative’s exposition, orientation, lead, or Introduction Paragraph.
Writing lessons scaffold the writing of sizzling starts.
The Backfill and the Get Back techniques conclude the writing of the exposition.
In addition, the graphic organizers, checklist, integration of technology (QR codes), and writing activities involving a short animated movie will facilitate your students to write their impressive openers.
The unit is divided into three sections.
SECTION 1: Sizzling Starts
Written samples are provided to demonstrate the writing of each sizzling start.
Students will then write their own sizzling starts after identifying the different openers and analyzing the written samples.
They will watch the short animated movie and write on the scene using each of the five main types of sizzling starts.
SECTION 2: Backfill and Get Back
Students will color code the sizzling start, backfill, and get back in written samples. They will match a Backfill to its Sizzling Start and write the Get Back to conclude the exposition.
SECTION 3: Writing the Exposition
Students will answer wh-questions to analyze sample expositions.
They will use the wh- questions graphic organizers to plan their expositions for given visual prompts. They will use the Expositions Checklist as they write the sizzling start, backfill, and get back for each exposition.
Teacher Key included for all sections.
Scaffold the structural components of a Persuasive Essay with this comprehensive pack of interactive notebook templates, posters, anchor charts, and graphic organisers.
FOCUS OF SCAFFOLDED LESSONS ON:
* Lesson activities feature the sample text, ‘Fast Food’.
1.The Introduction: hook, opinion, thesis statement
2.Five types of hooks: a strong statement, a scene, a rhetorical question, a definition, and a quotation.
3.The Body Paragraphs: topic sentence (reason), supporting details, concluding sentence
4.The Conclusion: summary statement, re-statement of reasons, call to action
SUPPLEMENTARY RESOURCES
1.Graphic organisers on the introduction, body and conclusion (can be used with other topics).
2.6 persuasive writing prompt cards (colour and blackline).
3.Self-editing checklist
4.Peer-editing checklist
5.Teacher Marking Rubric
6.Lined sheets
7.Flipbook (editable) to scaffold structure (maybe used as draft for editing and revising).
8.Posters/Anchor charts on the parts of a Persuasive Essay and persuasive language.
9.Links to four interesting topics for students to gain content knowledge prior to writing their own persuasive essays.
Brief Overview of Nature of Work: The Introduction, Body and Conclusion
THE INTRODUCTION:
Students will read the sample text on fast food (coloured posters) and note the parts of the Introduction. They will also read the sample texts for the five different ways to begin an persuasive essay: a strong statement, a scene, a rhetorical question, a definition, and a quotation.
Students will colour-code the parts of the introduction in the five sample texts (interactive notebook templates). Students will then practise writing the five ways of beginning an introduction. They will use a graphic organiser to plan their thesis (interactive notebook templates).
THE BODY:
Students will read the sample text on fast food (coloured posters) and note the parts of the body: a topic sentence encompassing the reason, supporting details and a concluding sentence. Students will colour-code the parts of the body in the sample text (interactive notebook templates). Students will then practise writing the first body paragraph. They will use a graphic organiser to plan their writing (interactive notebook templates).
THE CONCLUSION
Students will read the sample conclusion on fast food (coloured poster) and note the parts of the conclusion: a summary statement, re-statement of reasons, call to action. Students will colour-code the parts of the conclusion in the sample text (interactive notebook template). Students will then practise writing the conclusion. They will use a graphic organiser to plan their writing (interactive notebook templates).
To weave a compelling story is indeed an Art in its own kind and with the structured and scaffolded lessons this bundle offers, your students will be able to do just that.
This is a growing bundle. By purchasing this bundle you will have access to all future resources on Narrative Writing as they are released individually at no additional cost. The price will rise as consecutive packs/resources are added. The bundle features a mix of print-n-go sheets, mentor texts, interactive notebook templates, anchor charts, posters, checklists and rubrics.
The materials adhere to a formal writing style complete with close detail to elements of structure and composition of narrative texts. For further details of lessons and activities, read more about each resource included in this bundle
Your students will have as much fun as mine did in assembling this flipbook featuring the nine planets of the solar system.
What’s Included:
Flipbook templates in blackline to print.
Flipbook templates in colour to print.
Checklists and Marking Rubric
Vocabulary Cards
How to assemble flipbook:
You can choose either of the three options.
Print out the templates in blackline. Cut around each template and assemble from smallest template to largest template or as per order of planets. Have students colour in planets and lettering. Staple at the top.
Print out the templates on cardstock (different colors). Cut around each template and assemble. Students may colour in planets and lettering. Staple at the top.
Print out the coloured templates. Cut around each template and assemble. Staple at the top.
Interactive Notebook
Glue the last template ‘Pluto’ in notebook. Then glue the other templates (descending order) just at the top tab.
Suggested Use:
Have students refer to books, websites, and videos on the planets to record information.
List information that you want students to include in their report on the board, for example, planet’s distance from the sun, average temperature, number of moons (refer to rubric).
Versatility
The flipbook-style templates would make research on the planets more fun and engaging for students. The templates feature a visual of each of the nine planets and ample lines for students to write sufficient information.
Are you teaching your students all about the four kinds of sentences or the four types of sentences? Use this collection of Cornell-style note templates and the animated PowerPoint Presentation to reinforce the understanding of the four types of sentences: Declarative, Imperative, Interrogative, and Exclamatory.
Students will record information on the note-taking sheets while you present the Power Point.
The Dragon-theme will make learning all the more interesting for your students!
Both US and British English spellings and terminolgy included.
Items Included
Cornell-style Guided Note Templates x 4 sheets and 21 slide PowerPoint Presentation (US spelling & terminology)
Cornell-style Guided Note Templates x 4 sheets and 21 slide PowerPoint Presentation (British English spelling & terminology)
8 Posters Style 1 (color and blackline) featuring definitions and examples of the four types of sentences.
8 Posters Style 2 (color) featuring definitions and examples of the four types of sentences.
Posters come in two sizes: 8.5x11 inches and A4
The note-taking takes after Cornell styled guided notes. The PowerPoint presentation will equip your students with key content knowledge and ample practice on the four types of sentences prior to students working on other reinforcing activities.
The note-taking sheets require students to fill in the blanks as you present the PowerPoint slides. Content ranges from writing parts of definitions of grammatical terminology in addition to interactive practice examples.
Topics Covered in Presentation
Definition, Examples, Changing Sentence Type and Practice Quiz
Declarative sentence
Imperative Sentence
Interrogative Sentence
Exclamatory Sentence
Suggested Use
Run through the presentation yourself prior to presenting to students.
Present the slides one at a time, students will follow instructions on each slide like filling in the blanks on their note-taking sheets and attempting practice examples. The slides are animated to present information in manageable chunks.
Follow-up with task cards, practice sheets or notebook templates available in the bundle.
Use these flipbooks to scaffold the writing of Information Reports on Australian Animals. Students have a choice of 24 Australian Animals to research on. This resource can be used as a stand-alone flipbook or in an interactive notebook.
What’s Included:
24 EDITABLE cover templates in blackline to print. Images not editable.
EDITABLE Flipbook templates (2-7), in blackline to print.
*Self-editing checklist
*Peer-editing checklist
*Teacher Marking Rubric x 3 formats
*24 Vocabulary Display Cards
*Writing sheets x 3 styles
PARTS OF THE FLIPBOOK
COVER: 24 cover (images not editable) options featuring Australian animals. Students can pick the cover depending on what Australian animal is under study.
The following Australian animals are featured:
Bandicoot, Black Swan, Cockatoo, Dingo, Echidna, Emu, Kangaroo, Kiwi, Koala, Kookaburra, Platypus, Possum, Tasmanian Devil, Wombat, Bilby, Brown Snake, Crocodile, Frilled Neck, Lizard, Green Tree Snake, Quoll, Red Belly Snake, Cassowary, Sugar Glider, Thorny Devil
TEMPLATE 2: AUSTRALIAN ANIMAL
weight, length, family, and group of Australian animal. Students may also write a brief description.
TEMPLATE 3: HABITAT
location in Australia. A map of Australia is included to mark the location.
TEMPLATE 4: DIET
food the Australian animal eats to survive. There is place for illustration.
TEMPLATE 5: LIFE CYCLE
the breeding seasons and habits.
TEMPLATE 6: BEHAVIOUR
the physical and behavioural adaptations that enable the Australian animal to survive in its environment.
TEMPLATE 7: INTERESTING FACTS
any other interesting facts about the Australian animal that would sum up the information report.
HOW TO ASSEMBLE:
You can choose either of the options.
Print out the templates in blackline. Cut around each template and assemble from smallest template to largest template. Have students colour in cover page. Staple at top tab for flipbook or glue descending order in notebook.
Print out the templates on cardstock (different colours). Cut around each template and assemble. Attach at top.
** Have students refer to books, websites, and videos on the specific Australian animal to record information.
SUGGESTED USE:
Have students collect information in their flipbook on the Australian animal under study. This could also serve as their draft where they could use the self-editing and peer-editing checklists to edit. Finally have students publish on given writing sheets or type out content from draft observing corrections. The sections pertaining to habitat, diet, life-cycle, and behaviour can make-up the Body of the Report and 1-2 interesting facts to conclude the Information Report.
** These Australian Animal flipbooks are sure to make an interesting bulletin board display.
PRINTER SETTINGS: file >print > scale to fit paper
Build reading fluency of 144 CVC words with this 122 page pack of fluency reader strips/accordion foldables.
These accordion foldables may be glued into students’ interactive notebooks or stapled at the top to compile a mini strip booklet. They can also be fastened together with a brad to make a reading fan for each word family.
Each set comes in:
* Colour
* Blackline
* With visuals
* Without visuals
The word families in focus in these fluency reader strips/accordion foldables are:
-at, -an, -ap, -am, -ad, -ag, -ar, -ab, -ip, -id, -it, -in, -ig, -im, -ib, -ix, -et, -en, -ed, -eg, -em, -eb, -og, -op, -ot, -ox, -ob, -od, -ug, -ut, -ub, -un, -um, -ud, -us, -up, -ug
*Please note there is only a single column for some word family words; this is because the focus is primarily on nouns with visuals. For example, the -ad family on page 18 does not have a complete visual set of four words to be placed in the second column. Also eight words cannot be formulated with some word families or words are not appropriate like in the case of -ox, -ib, -ar, -un, -um etc. word families. In this case both columns will feature one set of words, this is so you can cut vertically and distribute to two students.
Your students will enjoy folding and reading each fluency strip foldable. This is definitely a great way to engage students in reading!
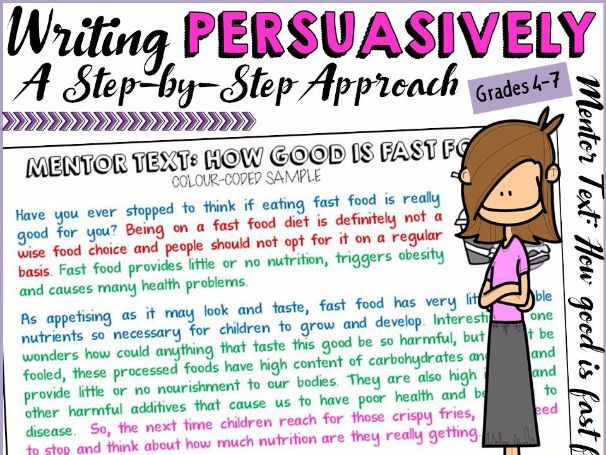
If you would like to teach your students a step-by step approach to writing persuasively and also scaffold every stage of the writing process, then you will find this resource very useful. All components in this pack are designed to facilitate students to write persuasive essays effectively in preparation for formal/Naplan testing.
The materials adhere to a formal writing style complete with close detail to elements of structure and composition of persuasive texts whereby opinion is supported by relevant details. Further details of lessons included in this pack are outlined below:
* All lessons to teach and model the parts of a Persuasive Essay revolve around the mentor text, ‘How Good is Fast Food?.’ Application of writing skills is targeted in the close writing prompt: The Importance of Eating Clean. The graphic organisers also enable students to write on other topics of choice.
LESSON 1: THE STRUCTURE
✓ Persuasive Writing Anchor Charts x 3
✓ Mentor Text x 1 on the topic ‘How Good is Fast Food?’
✓ Cut and glue parts of the mentor text activity to study structure
✓ Colour-code parts of the mentor text to study the structural components of the introduction, body and conclusion.
✓ Questions x 23 to draw attention to structure (to use with mentor text and informative article)
LESSON 2: THE INTRODUCTION
♦ Scaffolded activities based on the mentor text to enable students to write the three parts that make-up the introduction: hook, opinion and thesis statement.
LESSON 3: THE BODY
♦ Cut and glue interactive activities and reference to mentor text to help students better understand the parts of the three body paragraphs: the topic sentence encompassing the reason, supporting details and concluding sentence.
LESSON 4: THE CONCLUSION
♦ Reference to colour-coded mentor text and deconstructing parts of a concluding paragraph activity to better understand the parts: summary statement, re-statement of reasons and call to action.
ALSO INCLUDED:
✓ Graphic organisers to organise ideas of the introduction, body and conclusion when planning to write on a given prompt are included for all lessons.
✓ Writing templates for published pieces.
✓ Self-editing checklist
✓ Peer-editing checklist
✓ Teacher marking rubric
✓ Booklet cover for all lessons if compiling lesson sheets.
✓ Posters x 6 on Persuasive Writing Signal Words
Once you have taught students the style and structure of a Persuasive Essay, the job is half done. All the best! I hope you will have an idea of how I have used this resource with my students via the guided notes for each section. Further instructions on how to use this resource are in file.
Wish you and your students a successful year!
Flowers fade and chocolates finish, but a poem is sure to remain in every mother’s heart.
Get your students to dedicate four poems in a fun flipbook format to their mother as an expression of their love on Mother's Day.
WHAT’S INCLUDED
* Colour editable posters of four poem types for students’ reference.
* Blackline editable posters of four poem types for students’ reference.
* Blackline flipbook templates that feature the lined structure of the four poem types: Cinquain,
Diamante, Acrostic, Love You, Mum!
* Cover template: ‘For a Special Lady’.
SUGGESTED USE
✓ Print blackline templates. Have students fill in their own colours and assemble smallest to largest templates or vice versa after all poems are written.
✓ Print templates on different coloured cardstock.
✓✓This flipbook will be a memento for every mother to cherish.
To weave a compelling story is indeed an Art in its own kind and with the structured and scaffolded lessons this unit offers, your students will be able to do just that. Lessons in the first part of this unit focus on identifying the structure and features of a narrative. Mini lessons target use of transitions, description, figurative language, and dialogue to control pacing, in addition to effective ways to begin and conclude narratives. The provided narrative writing sample is editable giving you the flexibility to customise this unit to suit your students’ learning needs.
Narrative Writing Part I
IDENTIFYING THE STRUCTURE AND FEATURES OF A NARRATIVE
Lessons revolve around the sample personal narrative, ‘The Storm’. Students will identify the elements of a plot, use of figurative language, transitions, dialogue, and opening, body, and concluding paragraphs. They de-structure the parts of a narrative and note use of interesting vocabulary. An assessment sheet is also provided to assess comprehension. The following mini lessons are included:
USING TRANSITION WORDS AND PHRASES TO MANAGE SEQUENCE OF EVENTS
DESCRIPTION AND FIGURATIVE LANGUAGE TO SLOW DOWN PACE OF STORY
DIALOGUE IN WRITING
ANALYSE A NARRATIVE PROMPT – mini booklet
ORGANISE A NARRATIVE SHORT STORY
DRAFTING AN INTRODUCTION
NARRATIVE WRITING PART II
Students use all the skills acquired in Part I of this Narrative Writing unit to respond to On – Demand Narrative Writing Prompts that require students to write narratives to develop real or imagined experiences or events using effective technique, well‐chosen details and well-structured event sequences. Students have the choice of responding to 7 prompts with visuals. They use the given picture stimulus and graphic organisers to plan their writing and write their first draft. They will be familiar with this, having had ample practice in Narrative Writing Part I of this unit.
ALSO INCLUDED
* Writing Tools: Colour posters of the VCOP (Vocabulary, Connectives, Openers, Punctuation) gang to enable students to write creatively and edit their draft.
* self-editing checklist * peer-editing checklist
* Teacher Marking Rubric
* Suggested lesson overview and procedure for each writing activity included.
* Table of Contents for easier navigation.
Being able to read and comprehend effectively is vital if your students need to become competent readers and this can only be possible if they have sound knowledge of essential reading strategies that target the acquisition of this key skill.
This bundle of 20 Task Cards (with/without QR Codes), 53 Interactive Notebook Templates (with colour photographs of assembly instructions) and 30 graphic organisers (colour and blackline) is sure to equip your students with key reading skills, and in addition provide effective preparation for Naplan or Reading Assessments.
The 20 reading strategies in focus are:
⭐ Asking Questions
⭐ Cause and Effect
⭐ Characterisation
⭐ Compare and Contrast
⭐ Context Clues
⭐ Determining Importance
⭐ Drawing Conclusions
⭐ Fact and Opinion
⭐ Main Idea and Details
⭐ Making Connections
⭐ Making Inferences
⭐ Making Predictions
⭐ Problem and Solution
⭐ Setting
⭐ Sequencing
⭐ Story Elements
⭐ Summarising
⭐ Synthesising
⭐ Visualising
Further details of each of the three products included are as under:
1. TASK CARDS AND QR CODE CARDS
✋ These 20 post reading task cards will help your students practise 20 key reading strategies with any text they read. Each card has an explanation of the strategy and 2-3 tasks that require the application of that strategy.
✋ Students also have the option to use QR Codes. Each post-reading task card features a QR Code. Students will be able to use their I-pads/tablets to see a video explaining the strategy in focus prior to attempting the task card activity.
2. INTERACTIVE NOTEBOOK FOLDABLES
The 53 interactive notebook templates will provide your students with a hands-on approach to practising the application of key reading strategies with any text they read. The interactive notebook templates feature a definition or an explanation of the strategy and is accompanied with assembly instructions. Photographs of completed templates included.
3. GRAPHIC ORGANISERS: BLACKLINE AND COLOUR
These 30 graphic organisers will help your students practically apply 20 reading strategies with any text that they read. Each graphic organiser provides an explanation of the reading strategy in focus. Students will be able to successfully document their findings via the writing prompts. The eye-catching graphics and student-friendly organisation will surely motivate the most reluctant.
Use these flipbooks to scaffold the writing of Informational Reports on ocean animals. This resource can be used as a stand-alone flipbook or in an interactive notebook.
What’s Included:
Flipbook templates (1-7) in blackline to print.
Self-editing checklist
Peer-editing checklist
Teacher Marking Rubric x 4 formats
Writing sheets x 4 styles
PARTS OF THE FLIPBOOK
COVER: 20 cover options featuring ocean animals. Students can pick the cover depending on what ocean animal is under study. One blank cover included so students can illustrate.
The following ocean animals are featured:
clam, clownfish, crab, dolphin, eel, hermit crab, humpback whale, jellyfish, lobster, manatee, marlin, octopus, pufferfish, sand dollar, sea turtle, seahorse, shark, squid, starfish, stingray.
1. INTRODUCTION:
weight, length, family, and group of ocean animal. Students may also write a brief
description.
2. HABITAT x 2: location in the world. A world map is included to mark the location.
3. DIET: food the ocean animal eats to survive. There is place for illustration.
4. LIFE CYCLE: the breeding seasons and habits.
5. behaviour: the physical and behavioural adaptations that enable the ocean animal to survive in its environment.
6. INTERESTING FACTS: any other interesting facts about the ocean animal that would sum up the information report.
How to assemble:
You can choose either of the three options.
Print out the templates in blackline. Cut around each template and assemble from smallest template to largest template. Have students colour in cover page. Staple at top tab for flipbook or glue descending order in notebook.
Print out the templates on cardstock (different colours). Cut around each template and assemble. Attach at top.
** Have students refer to books, websites, and videos on the specific ocean animal to record information.
Suggested use:
Have students collect information in their flipbook on the ocean animal under study. This could also serve as their draft where they could use the self-editing and peer-editing checklists to edit.
Finally have students publish on given writing sheets or type out content from draft observing corrections. The sections pertaining to habitat, diet, life-cycle, and behaviour can make-up the Body of the Report and 1-2 interesting facts to conclude the Information Report.
** These Ocean Animal flipbooks are sure to make an interesting bulletin board display.
Use these flipbooks to scaffold the writing of Information Reports on Ice Age animals. This resource can be used as a stand-alone flipbook or in an interactive notebook.
What’s Included:
Flipbook templates (1-7) in blackline to print.
Self-editing checklist
Peer-editing checklist
Teacher Marking Rubric x 4 formats
Writing sheets x 4 styles
PARTS OF THE FLIPBOOK
12 cover options featuring Ice Age animals. Students can pick the cover depending on what Ice Age animal is under study. One blank cover included so students can illustrate.
The following Ice Age animals are featured:
Bison, Camel, Cave Bear, Dire Wolf, Giant Beaver, Giant Sloth, Glyptodont, Mammoth, Merriam's Teratorn, Sabre Tooth Tiger, Woolly Mammoth, Woolly Rhino.
TEMPLATES (1– 7)
1. INTRODUCTION:
weight, length, family, and group of Ice Age animal. Students may also write a brief description.
2. HABITAT x 2: location in the world. A world map is included to mark the location.
3. DIET: food the Ice Age animal ate to survive. There is place for illustration.
4. LIFE CYCLE: the breeding seasons and habits.
5. BEHAVIOUR: the physical and behavioural adaptations that enabled the Ice Age animal to survive in its environment.
6. INTERESTING FACTS: any other amazing facts about the Ice Age animal that would sum up the Informational Report.
How to assemble:
You can choose either of the three options.
Print out the templates in blackline. Cut around each template and assemble from smallest template to largest template. Have students colour in cover page. Staple at top tab for flipbook or glue descending order in notebook.
Print out the templates on cardstock (different colours). Cut around each template and assemble. Attach at top.
** Have students refer to books, websites, and videos on the specific Ice Age animal to record information.
*** Information on many Ice Age animals may be found here: http://a-z-animals.com/animals/
Suggested use:
Have students collect information in their flipbook on the Ice Age animal under study. This could also serve as their draft where they could use the self-editing and peer-editing checklists to edit. Finally have students publish on given writing sheets or type out content from draft observing corrections. The sections pertaining to habitat, diet, life-cycle, and behaviour can make-up the Body of the Report and 1-2 interesting facts to conclude the Informational Report.
** These Ice Age Animal flipbooks are sure to make an interesting bulletin board display.